
 URL 복사
 카카오톡 공유하기
커맨드패턴(Command Pattern)
커맨트 패턴이란?
커맨드 패턴은 이벤트가 발생했을때 실행될 기능이 다양하면서도 변경이 필요한 경우에,
이벤트를 발생시키는 클래스를 변경하지 않고 재사용하고자 할 때 유용하다.
<br/>
이해하기 어려우니 예를 들어보자.
"파일열기", "파일닫기"라는 메뉴 항목이 있다.
각 항목이 선택되었을때 실행 되는 기능이 다를 것이다.
각 기능을 구현하기위해 "메뉴" 클래스에 파일열기 기능을 구현하였다
각 기능을 구현하기위해 "메뉴" 클래스에 파일닫기 기능을 구현하였다
<br/>
근데 고객이 메뉴에 "파일추가" 기능을 추가 할 것을 요청했다.
추가된 기능을 구현하기위해 "메뉴" 클래스에 파일추가 기능을 구현하였다.
"메뉴"클래스에 참조값을 늘렸고, "메뉴"클래스를 수정하게 되었다.
즉 "메뉴" 클래스는 재사용 할 수 없었다.
<br/>
커맨트 패턴은 "메뉴"클래스를 재사용하게 하는데 유용하다.
N번의 고객의 추가 기능 요청해도 수정없이, 재사용 할 수 있도록 하게 하는 것이다.
커맨드 패턴은 기능을 요구하는 호출자 클래스와 실제 기능을 수행하는 "수신자" 클래스의 의존성을 제거 한다.
<br/>
예를 통해 구현해보자.
만능 버튼을 만들려고하는 고객의 요청이 생겼다.
만능 버튼에 기능으로, 버튼이 눌렸을때 램프의 전원 ON 기능을 요청하였다.
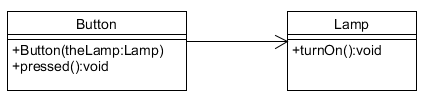
개발자는 다음과 같이 클래스 구조를 설계하였다.
<img src="https://static.podo-dev.com/blogs/images/2019/07/10/origin/F51T4F181224235507.PNG">
-
버튼 클래스
-
램프 클래스
<br/>
버튼을 누르면, 램프를 켜야하므로 Button클래스는 Lamp 클래스를 참조한다.
<br/>
다음과 같이 구현하였다.
public class Button {
	private Lamp theLamp;

	public Button(Lamp theLamp) {
		super();
		this.theLamp = theLamp;
	}

	public void pressed() {
		theLamp.turnOn();
	}
}
<br/>
public class Lamp {
	public void turnOn() {
		System.out.println("램프에 전원이 켜졌습니다.");
	}
}
public class Main {
	public static void main(String[] args) {
		Lamp theLamp = new Lamp();
		Button button = new Button(theLamp);

		button.pressed();
	}
}
<br/>
<br/>
출력값
램프에 전원이 켜졌습니다.
<br/>
정상적으로 로직이 구동되어, 정상 출력하였다.
<br/>
그러나 고객의 추가적인 요구사항이 생겼다.
"만능 버튼이니까, 버튼을 누르면 알람 켜주는 기능도 넣어주세요!"
<br/>
개발자는 요청사항을 받아들여 다음과 같이 설계하였다.
<img src="https://static.podo-dev.com/blogs/images/2019/07/10/origin/XVSMXB181224235507.PNG">
-
버튼 클래스
-
램프 클래스
-
알람 클래스
<br/>
<br/>
버튼을 누르면, 램프를 켜야하므로 Button클래스는 Lamp 클래스를 참조한다.
버튼을 누르면, 알람을 켜야하므로 Button클래스는 Alarm 클래스를 참조한다.
<br/>
다음과 같이 구현하였다.
public enum Mode {
	LAMP, ALARM;
}
<br/>
public class Button {
	private Lamp theLamp;
	private Alarm theAlarm;
	private Mode theMode;

	public Button(Lamp theLamp, Alarm theAlarm) {
		this.theLamp = theLamp;
		this.theAlarm = theAlarm;
	}

	public void setTheMode(Mode theMode) {
		this.theMode = theMode;
	}

	public void pressed() {
		switch (theMode) {
		case LAMP:
			theLamp.turnOn();
			break;
		case ALARM:
			theAlarm.start();
			break;
		}

	}
}
public class Alarm {
	public void start() {
		System.out.println("알람이 켜졌습니다.");
	}

}
public class Lamp {
	public void turnOn() {
		System.out.println("램프에 전원이 켜졌습니다.");
	}
}
public class Main {
	public static void main(String[] args) {
		Lamp theLamp = new Lamp();
		Alarm theAlarm = new Alarm();
		Button button = new Button(theLamp, theAlarm);

		button.setTheMode(Mode.LAMP);
		button.pressed();

		button.setTheMode(Mode.ALARM);
		button.pressed();

	}
}
<br/>
<br/>
출력값
램프에 전원이 켜졌습니다.
알람이 켜졌습니다.
요구에 맞게 정상적으로 로직이 구동되어, 정상 출력하였다.
<br/>
그러나 고객은 다음의 요구를 더 요청하였다.
"만능 버튼이니까, 램프 끄는 기능, 알람 끄는 기능도 추가해주세요!"
<br/>
개발자는 고민하였다. 앞으로 고객이 만능버튼이라고 기능을 계속 요청할 것이다.
버튼 클래스에 기능을 계속구현하여 N개의 값에 스위치문으로 N개를 구분할 수는 없다.
또 N개의 기능이 추가되면 N번의 Button클래스를 수정해야 할지도 모른다.
따라서 디자인패턴 중** 커맨드 패턴**을 이용하려고한다.
<br/>
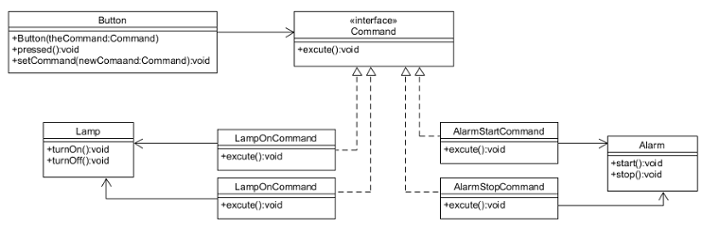
개발자는 다음과 같이 클래스 구조를 설계하였다.
<img src="https://static.podo-dev.com/blogs/images/2019/07/10/origin/RAZX8K181224235507.PNG">
- Button클래스는 Command 인터페이스를 참조한다.
<br/>
각 기능들은 Command 인터페이스를 상속받아 excute() 메소드를 구현한다.
이제 N개의 기능이 추가되더라도, Button 클래스는 수정하지 않아도 될것이다.
또한 호출클래스인 Button 클래스와, 수신클래스인 Lamp클래스와의 의존도 또한 제거되었다.
<br/>
다음과 같이 구현하였다.
public class Button {
	private Command theCommand;

	public void setTheCommand(Command theCommand) {
		this.theCommand = theCommand;
	}

	public void pressed() {
		theCommand.excute();
	}
}
public class Alarm {
	public void start() {
		System.out.println("알람이 켜졌습니다.");
	}

	public void stop() {
		System.out.println("알람이 꺼졌습니다.");
	}
}
public class Lamp {
	public void turnOn() {
		System.out.println("램프에 전원이 켜졌습니다.");
	}

	public void turnOff() {
		System.out.println("램프에 전원이 꺼졌습니다.");
	}
}
public interface Command {
	public void excute();
}
<br/>
public class AlarmStartCommand implements Command {
	private Alarm theAlarm;

	public AlarmStartCommand(Alarm theAlarm) {
		this.theAlarm = theAlarm;
	}

	@Override
	public void excute() {
		theAlarm.start();
	}

}
<br/>
public class AlarmStopCommand implements Command {
	private Alarm theAlarm;

	public AlarmStopCommand(Alarm theAlarm) {
		this.theAlarm = theAlarm;
	}

	@Override
	public void excute() {
		theAlarm.stop();
	}

}
public class LampOnCommand implements Command {
	private Lamp theLamp;

	public LampOnCommand(Lamp theLamp) {
		this.theLamp = theLamp;
	}

	@Override
	public void excute() {
		theLamp.turnOn();
	}

}
<br/>
public class LampOffCommand implements Command {
	private Lamp theLamp;

	public LampOffCommand(Lamp theLamp) {
		this.theLamp = theLamp;
	}

	@Override
	public void excute() {
		theLamp.turnOff();
	}

}
<br/>
public class Main {
	public static void main(String[] args) {
		Lamp theLamp = new Lamp();
		Alarm theAlarm = new Alarm();
		Button button = new Button();

		button.setTheCommand(new LampOnCommand(theLamp));
		button.pressed();

		button.setTheCommand(new LampOffCommand(theLamp));
		button.pressed();

		button.setTheCommand(new AlarmStartCommand(theAlarm));
		button.pressed();

		button.setTheCommand(new AlarmStopCommand(theAlarm));
		button.pressed();

	}
}
<br/>
출력값
램프에 전원이 켜졌습니다.
램프에 전원이 꺼졌습니다.
알람이 켜졌습니다.
알람이 꺼졌습니다.
<br/>
<br/>
<br/>