
 URL 복사
 카카오톡 공유하기
Telegram 챗봇으로 댓글 알림 설정하기
댓글이나 방명록 등록시에 알람이 오도록 해보려합니다.
카카오는 플러스 친구를 등록해야해서 불가능하고,, 텔레그램을 이용하였습니다.
<br/>
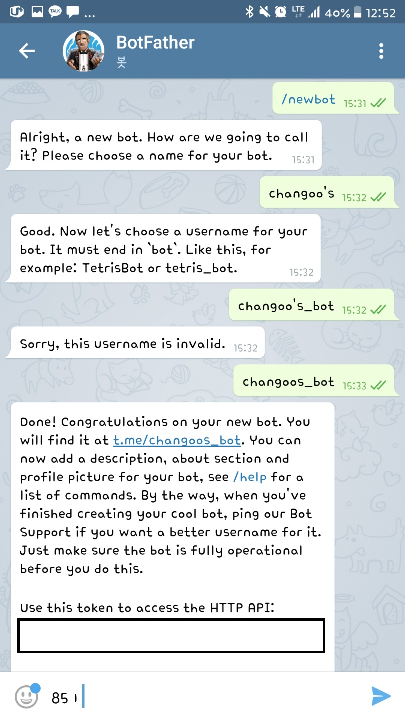
우선 텔레그램의 BotFather를 검색해서 봇을 생성합니다.
<img alt="" src="https://static.podo-dev.com/blogs/images/2019/07/10/origin/QS3D9O181224235517.PNG" style="width:360px"/>
-
/newbot 명령어를 실행한다.
-
bot의 이름을 지정해준다.
-
username을 지정해준다 postfix로 "_bot" , "Bot"을 반드시 입력해야 합니다.
<br/>
<br/>
생성이 완료되면 <span style="color:#2980b9">botToken을 받을 수 있습니다.
대화를 주고 받기위해서는 <span style="color:#2980b9">botToken, chat_id 2가지가 필요합니다.
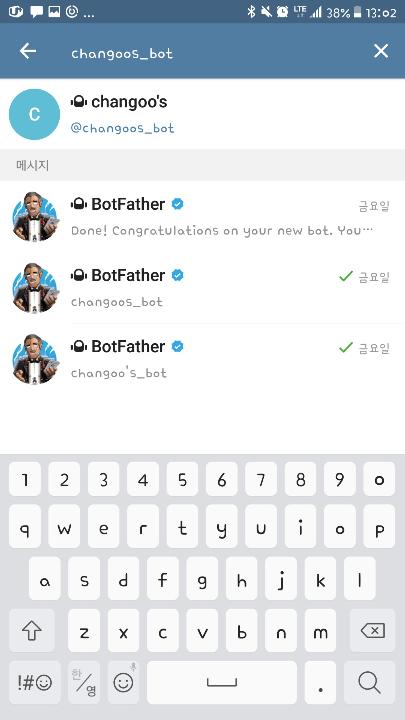
그럼 이제 botToken을 받았으니. chat_id를 알아야 합니다.
<br/>
<img alt="" src="https://static.podo-dev.com/blogs/images/2019/07/10/origin/ZA2FNO181224235518.JPG" style="width:360px"/>
방금 생성한 bot의 botUsername으로 텔레그램에 검색해봅니다.
위에 예시를 보면 "changoos_bot"으로 검색하면됩니다.
<br/>
<img alt="" src="https://static.podo-dev.com/blogs/images/2019/07/10/origin/GBMLNZ181224235518.JPG" style="width:360px"/>
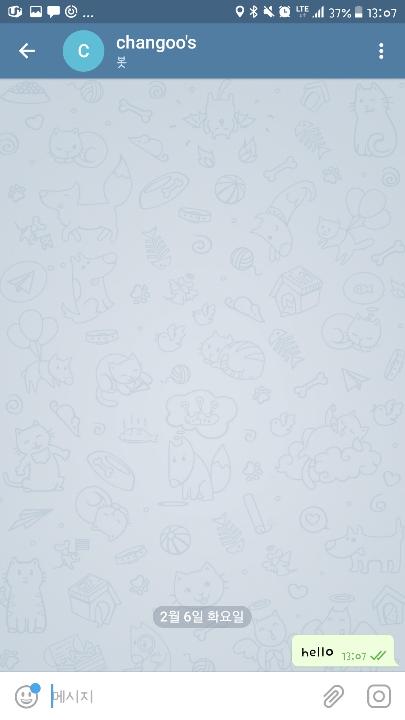
대화를 열어 채팅을 하나 보냅니다.
<br/>
다음으로 <span style="color:#2980b9">https://api.telegram.org/bot<token>/getUpdates <span style="color:null">접속합니다.
<span style="color:null">봇이 받은 메시지를 확인 하는 URL 경로입니다.
<span style="color:#2980b9"><token> <span style="color:null">부분을 자신의 <span style="color:#2980b9">botToken<span style="color:null">으로 변경한다.
<span style="color:#2980b9">botToken이 <span style="color:#2980b9">"000000000:AAAAAAAAAAAAAAAAAAAAAAAAAAAAA" 이라면
<span style="color:#2980b9">https://api.telegram.org/bot000000000:AAAAAAAAAAAAAAAAAAAAAAAAAAAAA/getUpdates <span style="color:#000000">로 URL요청을 보냅니다.
<br/>
<span style="color:#000000">해당 페이지로 접속하면 다음과 같이 JSON 형태의 결과를 확인 할 수 있습니다.
{"ok":true,"result":[{"update_id":343103557,
"message":{"message_id":156,"from":{"id":503609560,"is_bot":false,"first_name":"\ucc2c\uad6c","last_name":"\uc774","language_code":"ko"},"chat":{"id":503609560,"first_name":"\ucc2c\uad6c","last_name":"\uc774","type":"private"},"date":1517890033,"text":"hell0"}}]}
방금 보낸 Hello 메세지에 대한 정보입니다.
여기서 중요한건 <span style="color:#2980b9">chat의 id값입니다.
예시의 코드를 보면 chat_id는 "<span style="color:#2980b9">503609560" 임을 확인 할 수 있습니다.
<br/>
<br/>
이제 대화에 필요한 <span style="color:#2980b9">botToken과, <span style="color:#2980b9">chat_id를 얻었으니 서버 - 텔레그램과 통신해야 합니다.
마찬가지로 URL 요청을 통해 봇이 사용자에게 메세지를 보낼 수 있습니다.
<br/>
<em>보다 쉽게 봇을 사용 할 수 있도록 <a href="https://github.com/rubenlagus/TelegramApi">Telegram</a> 라이브러리가 있습니다. Java 1.8 부터 지원합니다.</em>
<em>해당 라이브러리를 사용하면, 사용자가 BOT으로 보낸 메세지를 텔레그램 서버를 넘어 자바단에서 바로 확인가능합니다.</em>
<em>따라서 받은 메세지, 명령어에 따라 로직을 수행하여, 바로 답장할 수 있습니다.</em>
<em>또한 키보드, 사진, 답장 등 채팅과 관련된 여러 기능을 사용할 수 있습니다. </em>
<em>사용한다면 더 많은 기능을 추가 할 수 있을 것입니다.</em>
<br/>
원하는 기능은 단순히 톡을 보내는(알람을 주는) 기능이기 때문에
라이브러리를 사용하지 않고 해당 부분만 구현해봅니다.
HttpURLConnection 클래스를 이용해봅니다.
<br/>
<hr/>
<br/>
! 우선 간단한 스프링 설정을 해주었습니다.
이 부분은 텔레그램과 무관하니 스킵하셔도 됩니다.
<br/>
<span style="color:#2980b9">interceptor-context.xml
<mvc:interceptors>
	<mvc:interceptor>
	    <mvc:mapping path="/introduce/remain_message.do" />
		<bean class="com.cglee079.portfolio.interceptor.VMsgNoticeInterceptor"></bean>
	</mvc:interceptor>
</mvc:interceptors>
-
3 : 해당 경로 이동시 인터셉터 (방명록 남기는 Ajax 경로)
-
4 : 인터셉터시 핸들 객체
<br/>
<br/>
<span style="color:#2980b9">VMsgNoticeInterceptor.java
public class VMsgNoticeInterceptor extends HandlerInterceptorAdapter {

	@Override
	public void afterCompletion(HttpServletRequest request, HttpServletResponse response, Object handler, Exception ex)
			throws Exception {
		//send message to telegram
		super.afterCompletion(request, response, handler, ex);
	}

}
-
1 : HandleInterceptorAdapter 상속
-
4 : 페이지 요청 처리후에 호출 되는 함수
-
6 : 텔레그램 메세지 전송 로직 구현
<br/>
<br/>
<span style="color:#000000">Interceptor에 VMsgNoticeInterceptor 핸들러를 등록해주었습니다.
<span style="color:#000000">설정된 URL 요청시 Intercept하여 , 페이지 요청 처리후 afterCompletion 함수가 호출 될 것입니다.
<span style="color:#000000">이 부분에 텔레그램 알림 로직을 구현하도록 하겠습니다.
<br/>
<hr/>
<br/>
<br/>
먼저 해당 봇이 사용자에게 톡을 보내는 URL은 다음과 같습니다.
<span style="color:#2980b9">https://api.telegram.org/bot<token>/sendmessage?chat_id=<chat_id>&text=<message>
<span style="color:#2980b9"><token><span style="color:#000000">에는 botToken을 입력해줍니다.
<span style="color:#2980b9"><chat_id><span style="color:#000000">에는 chat_id를 입력해줍니다.
<span style="color:#2980b9"><message><span style="color:#000000">에는 보낼 매세지를 입력해줍니다.
<br/>
<br/>
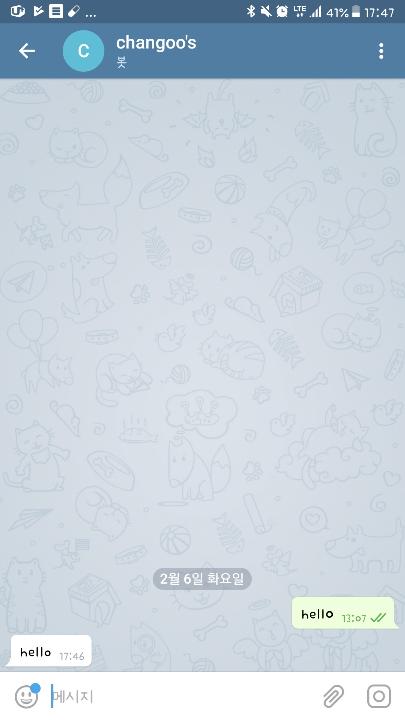
<span style="color:#000000">테스트를 위해서 한번 해당 URL 요청을 보내봅니다.
예를들어
<span style="color:#2980b9">botToken = "000000000:AAAAAAAAAAAAAAAAAAAAAAAAAAAAA"
<span style="color:#2980b9">chat_id = "123456"
<span style="color:#2980b9">text = "Hello" 라고한다면
<span style="color:#2980b9">https://api.telegram.org/bot000000000:AAAAAAAAAAAAAAAAAAAAAAAAAAAAA/sendmessage?chat_id=123456&text=Hello 로 요청을 보내봅니다.
<br/>
<img alt="" src="https://static.podo-dev.com/blogs/images/2019/07/10/origin/CJEPFA181224235518.JPG" style="width:360px"/>
{"ok":true,"result":{"message_id":157,"from":{"id":485435157,"is_bot":true,"first_name":"changoo's","username":"changoos_bot"},"chat":{"id":503609560,"first_name":"\ucc2c\uad6c","last_name":"\uc774","type":"private"},"date":1517906807,"text":"hello"}}
메세지가 잘 온다면 성공적인 것입니다.
<br/>
그럼 이제 다음 클래스를 살펴봅니다.
public class TelegramHandler {
	private String defaultUrl = "https://api.telegram.org/bot";
	private String botToken;
	private String botUsername;
	private String chatId;

	public TelegramHandler(String botToken, String botUsername, String chatId) {
		this.botToken = botToken;
		this.botUsername = botUsername;
		this.chatId = chatId;
		defaultUrl += botToken;
	}

	public JSONObject sendMessage(String text) throws IOException {
		String sendUrl = defaultUrl;
		sendUrl += "/sendmessage";
		sendUrl += "?";
		sendUrl += "chat_id=";
		sendUrl += chatId;
		sendUrl += "&text=";
		sendUrl += URLEncoder.encode(text, "UTF-8");

		HttpURLConnection connection = null;
		URL url = new URL(sendUrl);
		connection = (HttpURLConnection) url.openConnection();
		connection.setRequestMethod("GET");
		connection.setConnectTimeout(3000);
		connection.setReadTimeout(3000);

		BufferedReader reader = new BufferedReader(new InputStreamReader(connection.getInputStream(), "UTF-8"));
		StringBuffer buffer = new StringBuffer();
		String line = null;
		while ((line = reader.readLine()) != null) {
			buffer.append(line).append("\r\n");
		}
		reader.close();

		return new JSONObject(buffer.toString());
	}
}
-
2 : 기본 URL prefix
-
7 : 생성자로 botToken, username, chat_id 매개변수
-
14 : 메세지를 보내는 함수
-
21 : 메세지를 URL인코딩 (행 개행, 특수문자 처리)
<br/>
<span style="color:#000000">sendMessage 함수 호출시에, HttpURLConnection 클래스를 통해 URL에 파라미터를 붙여 메세지를 보내게 됩니다.
<br/>
<span style="color:#8e44ad">interceptor-context.xml
<bean id="TelegramHandler" class="com.cglee079.portfolio.util.TelegramHandler">
	<constructor-arg index="0" value="<botToken>"></constructor-arg>
	<constructor-arg index="1" value="<bot_username>"></constructor-arg>
	<constructor-arg index="2" value="<chat_id>"></constructor-arg>
</bean>
다음과 같이 TelegramHandler의 bean 객체를 생성해주었습니다.
<br/>
<span style="color:#2980b9">VMsgNoticeInterceptor.java
public class VMsgNoticeInterceptor extends HandlerInterceptorAdapter {

	@Autowired
	private TelegramHandler telegramHandler;

	@Override
	public void afterCompletion(HttpServletRequest request, HttpServletResponse response, Object handler, Exception ex)
			throws Exception {

		String contents = request.getParameter("contents");
		String msg = "#방명록이 등록되었습니다.\n";
		msg += "시간 : " + Formatter.toDateTime(new Date()) + "\n";
		msg += "내용 :\n";
		msg += contents;
		telegramHandler.sendMessage(msg);

		super.afterCompletion(request, response, handler, ex);
	}
}
-
<span style="color:#e74c3c">3 : TelegramHandler bean Autowired
-
10 ~ 14 : 메세지 다듬기
-
15 : 메세지 전송
<br/>
<br/>
이제 방문자가 방명록을 남기면,
Interceptor과 캐치하여, 모든 요청 처리후에 텔레그램으로 메세지를 보낼 것입니다.
<img alt="" src="https://static.podo-dev.com/blogs/images/2019/07/10/origin/RLZ8P1181224235518.JPG" style="width:360px"/>